
Wajib Kunjungi


Kalender
| S | S | R | K | J | S | M |
|---|---|---|---|---|---|---|
| 1 | 2 | 3 | 4 | 5 | ||
| 6 | 7 | 8 | 9 | 10 | 11 | 12 |
| 13 | 14 | 15 | 16 | 17 | 18 | 19 |
| 20 | 21 | 22 | 23 | 24 | 25 | 26 |
| 27 | 28 | 29 | 30 | 31 | ||
Pakar dan Awam sama saja, sama sama belajar
Setelah kita membuat file configurasi setiap modem satu file config maka untuk Cara mudahnya menjalankan service gammu dengan berbeda modem adalah dengan memasukkan perintah di /etc/rc.local
service gammu-smsd start
gammu-smsd –daemon –user gammu -c /etc/gammu-smsdrc1 –pid /var/run/gammu-smsd1.pid
gammu-smsd –daemon –user gammu -c /etc/gammu-smsdrc2 –pid /var/run/gammu-smsd2.pid
gammu-smsd –daemon –user gammu -c /etc/gammu-smsdrc3 –pid /var/run/gammu-smsd3.pid
Agar layanan service daemon tetap terjaga kita bisa memaasukkan perintah di crontab :
* * * * * /etc/rc.local
root@singaraja:~# mkdir /etc/openvpn/easy-rsa
root@singaraja:~# cp -ai /usr/share/doc/openvpn/examples/easy-rsa/2.0/ /etc/openvpn/easy-rsa/
root@singaraja:~# cd /etc/openvpn/easy-rsa/2.0/
root@singaraja:/etc/openvpn/easy-rsa/2.0# nano vars
root@singaraja:/etc/openvpn/easy-rsa/2.0# source ./vars
NOTE: If you run ./clean-all, I will be doing a rm -rf on /etc/openvpn/easy-rsa/2.0/keys
root@singaraja:/etc/openvpn/easy-rsa/2.0# ./clean-all
root@singaraja:/etc/openvpn/easy-rsa/2.0# ./build-ca
Generating a 1024 bit RSA private key
…………++++++
…………………..++++++
writing new private key to ‘ca.key’
—–
You are about to be asked to enter information that will be incorporated
into your certificate request.
What you are about to enter is what is called a Distinguished Name or a DN.
There are quite a few fields but you can leave some blank
For some fields there will be a default value,
If you enter ‘.’, the field will be left blank.
—–
Country Name (2 letter code) [ID]:
State or Province Name (full name) [JB]:
Locality Name (eg, city) [Bandung]:
Organization Name (eg, company) [passionit]:
Organizational Unit Name (eg, section) [changeme]:singaraja
Common Name (eg, your name or your server’s hostname) [changeme]:semar
Name [changeme]:semar
Email Address [awangga@passionit.co.id]:
root@singaraja:/etc/openvpn/easy-rsa/2.0# ./build-key-server semar
Generating a 1024 bit RSA private key
…………++++++
……………++++++
writing new private key to ‘semar.key’
—–
You are about to be asked to enter information that will be incorporated
into your certificate request.
What you are about to enter is what is called a Distinguished Name or a DN.
There are quite a few fields but you can leave some blank
For some fields there will be a default value,
If you enter ‘.’, the field will be left blank.
—–
Country Name (2 letter code) [ID]:
State or Province Name (full name) [JB]:
Locality Name (eg, city) [Bandung]:
Organization Name (eg, company) [passionit]:
Organizational Unit Name (eg, section) [changeme]:serversemar
Common Name (eg, your name or your server’s hostname) [semar]:serversemar
Name [changeme]:serversemar
Email Address [awangga@passionit.co.id]:
Please enter the following ‘extra’ attributes
to be sent with your certificate request
A challenge password []:
An optional company name []:
Using configuration from /etc/openvpn/easy-rsa/2.0/openssl-1.0.0.cnf
Check that the request matches the signature
Signature ok
The Subject’s Distinguished Name is as follows
countryName :PRINTABLE:’ID’
stateOrProvinceName :PRINTABLE:’JB’
localityName :PRINTABLE:’Bandung’
organizationName :PRINTABLE:’passionit’
organizationalUnitName:PRINTABLE:’serversemar’
commonName :PRINTABLE:’serversemar’
name :PRINTABLE:’serversemar’
emailAddress :IA5STRING:’awangga@passionit.co.id’
Certificate is to be certified until Oct 28 12:02:09 2024 GMT (3650 days)
Sign the certificate? [y/n]:y
1 out of 1 certificate requests certified, commit? [y/n]y
Write out database with 1 new entries
Data Base Updated
root@singaraja:/etc/openvpn/easy-rsa/2.0# ./build-key iqromedia
Generating a 1024 bit RSA private key
…………………++++++
……………………………………++++++
writing new private key to ‘iqromedia.key’
—–
You are about to be asked to enter information that will be incorporated
into your certificate request.
What you are about to enter is what is called a Distinguished Name or a DN.
There are quite a few fields but you can leave some blank
For some fields there will be a default value,
If you enter ‘.’, the field will be left blank.
—–
Country Name (2 letter code) [ID]:
State or Province Name (full name) [JB]:
Locality Name (eg, city) [Bandung]:
Organization Name (eg, company) [passionit]:
Organizational Unit Name (eg, section) [changeme]:iqromedia
Common Name (eg, your name or your server’s hostname) [iqromedia]:
Name [changeme]:iqromedia
Email Address [awangga@passionit.co.id]:
Please enter the following ‘extra’ attributes
to be sent with your certificate request
A challenge password []:
An optional company name []:
Using configuration from /etc/openvpn/easy-rsa/2.0/openssl-1.0.0.cnf
Check that the request matches the signature
Signature ok
The Subject’s Distinguished Name is as follows
countryName :PRINTABLE:’ID’
stateOrProvinceName :PRINTABLE:’JB’
localityName :PRINTABLE:’Bandung’
organizationName :PRINTABLE:’passionit’
organizationalUnitName:PRINTABLE:’iqromedia’
commonName :PRINTABLE:’iqromedia’
name :PRINTABLE:’iqromedia’
emailAddress :IA5STRING:’awangga@passionit.co.id’
Certificate is to be certified until Oct 28 12:03:25 2024 GMT (3650 days)
Sign the certificate? [y/n]:y
1 out of 1 certificate requests certified, commit? [y/n]y
Write out database with 1 new entries
Data Base Updated
root@singaraja:/etc/openvpn/easy-rsa/2.0# ./build-dh
Generating DH parameters, 1024 bit long safe prime, generator 2
This is going to take a long time
………………………..+.+…………….+…………………………………………………………………………………………………………………+……………………+…………………+………………………………………………………………………………..+…………………………………………………………………………………………………………………………..+……………+……………..+………………………………….+…….+……………………………….+………+…………………………………..+…………………………………………………………………………………+….+…………………………………………………………………………………………………………………………………+……..+.+………….+……+………………………+…….+…………….+………….+……………………+……………………………………………………………………………….+………………………………………………….+………………………………………+…………..+……….+…………+………………………………………………………………….+…………………………………………………..+…………………….+……………………………………………….+…………………………………………………………………………………………………………………………………………………………………+..+…………………………………………………+…+………+……+……….+……………………………………………+…………………………………………………………………………..+……………………………….+…………………………+……………+………………………………………………+……………………………..+….+…………………………………………….+……………………………………………………………………………………+……………………………………………………………..+……………+…………………………………..+……………………….+…………………………………………………………………………..+…………………………………………..+…………………………………………………………………..+……………………..+…………………………………………+…………………………………………………………………………………………….+………..+…….+……………………………………………………………………..+………………………………………………………………………………..+…+…………………+………+…………………+……………………………………..+…………..+….+………………….+……….+…………………………………..+……………………………………………………………………..+…………………………+…………+………………………+…………+………………………………..+………………..+………………………………………………………………………………………………………………….+………………..++*++*++*
root@singaraja:/etc/openvpn/easy-rsa/2.0# cd ..
root@singaraja:/etc/openvpn/easy-rsa# cd ..
root@singaraja:/etc/openvpn# cp ./easy-rsa/2.0/keys/ca.crt .
root@singaraja:/etc/openvpn# cp ./easy-rsa/2.0/keys/semar.key .
root@singaraja:/etc/openvpn# cp ./easy-rsa/2.0/keys/semar.crt .
root@singaraja:/etc/openvpn# cp ./easy-rsa/2.0/keys/dh1024.pem .
root@singaraja:/etc/openvpn# cp /usr/share/doc/openvpn/examples/sample-config-files/server.conf.gz .
root@singaraja:/etc/openvpn# gunzip server.conf.gz
root@singaraja:/etc/openvpn# nano server.conf
# [server.conf]
port 1194
proto udp
dev tun
ca /etc/openvpn/ca.crt
cert /etc/openvpn/server.crt
key /etc/openvpn/server.key
dh /etc/openvpn/dh1024.pem
server 10.8.0.0 255.255.255.0
ifconfig-pool-persist ipp.txt
push "redirect-gateway def1 bypass-dhcp"
push "dhcp-option DNS 202.107.105.13"
push "dhcp-option DNS 202.108.107.21"
keepalive 10 120
comp-lzo
user nobody
group nogroup
persist-key
persist-tun
status openvpn-status.log
verb 3
root@singaraja:/etc/openvpn# service openvpn start
[ ok ] Starting virtual private network daemon: server.
root@singaraja:/etc/openvpn# ifconfig
eth0 Link encap:Ethernet HWaddr 74:d4:35:e0:7d:10
inet addr:192.168.1.4 Bcast:192.168.1.255 Mask:255.255.255.0
inet6 addr: fe80::76d4:35ff:fee0:7d10/64 Scope:Link
UP BROADCAST RUNNING MULTICAST MTU:1500 Metric:1
RX packets:165854998 errors:17 dropped:0 overruns:0 frame:8
TX packets:184415361 errors:0 dropped:0 overruns:0 carrier:0
collisions:0 txqueuelen:1000
RX bytes:109560987302 (102.0 GiB) TX bytes:158607736676 (147.7 GiB)
Interrupt:20 Memory:d3800000-d3820000
lo Link encap:Local Loopback
inet addr:127.0.0.1 Mask:255.0.0.0
inet6 addr: ::1/128 Scope:Host
UP LOOPBACK RUNNING MTU:16436 Metric:1
RX packets:1234141 errors:0 dropped:0 overruns:0 frame:0
TX packets:1234141 errors:0 dropped:0 overruns:0 carrier:0
collisions:0 txqueuelen:0
RX bytes:1405142544 (1.3 GiB) TX bytes:1405142544 (1.3 GiB)
tun0 Link encap:UNSPEC HWaddr 00-00-00-00-00-00-00-00-00-00-00-00-00-00-00-00
inet addr:10.8.0.1 P-t-P:10.8.0.2 Mask:255.255.255.255
UP POINTOPOINT RUNNING NOARP MULTICAST MTU:1500 Metric:1
RX packets:0 errors:0 dropped:0 overruns:0 frame:0
TX packets:0 errors:0 dropped:0 overruns:0 carrier:0
collisions:0 txqueuelen:100
RX bytes:0 (0.0 B) TX bytes:0 (0.0 B)
root@singaraja:/etc/openvpn# cat /proc/sys/net/ipv4/ip_forward
1
root@singaraja:/etc/openvpn# route -n
Kernel IP routing table
Destination Gateway Genmask Flags Metric Ref Use Iface
0.0.0.0 192.168.1.254 0.0.0.0 UG 0 0 0 eth0
0.0.0.0 192.168.1.254 0.0.0.0 UG 100 0 0 eth0
10.8.0.0 10.8.0.2 255.255.255.0 UG 0 0 0 tun0
10.8.0.2 0.0.0.0 255.255.255.255 UH 0 0 0 tun0
192.168.1.0 0.0.0.0 255.255.255.0 U 0 0 0 eth0
root@singaraja:/etc/openvpn# cp /usr/share/doc/openvpn/examples/sample-config-files/client.conf ./easy-rsa/2.0/keys/
root@singaraja:/etc/openvpn# nano ./easy-rsa/2.0/keys/client.conf
# [client.conf]
client
dev tun
proto udp
remote 66.32.272.181 1194
resolv-retry infinite
nobind
user nobody
group nogroup
persist-key
persist-tun
mute-replay-warnings
ca /etc/openvpn/ca.crt
cert /etc/openvpn/client_kevin.crt
key /etc/openvpn/client_kevin.key
ns-cert-type server
comp-lzo
verb 3
Bisa langsung saja ikuti langkah berikut ini :
untuk kepentingan update ke versi jdk terbaru anda bisa mengikuti langkah berikut :
http://d.stavrovski.net/blog/post/installing-oracle-java-8-on-debian-wheezy-or-ubuntu
apabila dibutuhkan, bisa menghapus versi java sebelumnya
http://www.wikihow.com/Install-Oracle-Java-JRE-on-Ubuntu-Linux
Untuk membuat Virtual host anda harus memasuki host manager anda kemudian, anda bisa memasukkan absolute path host virtual anda dengan skeleton direktori didalamnya ada ROOT, didalam root ada META-INF.
Its just simple to use openvpn on raspbian, just take a simple step :
1. instaling openvpn : apt-get install openvpn
2. download vpngate config file with extension .ovpn and place it to /etc/openvpn
3. [optional] to connect automatically at startup just change extension .ovpn to .conf.
4. create user.txt file filled with user and password in two rows exactly like below and change permision to 700 :
vpn
vpn
5. in the .ovpn or .conf file add a line like this
auth-user-pass user.txt
6. Connect with command:
openvpn –daemon –cd /etc/openvpn –config vpngate.conf
Reference :
https://forums.openvpn.net/topic12666.html
http://www.ibvpn.com/billing/knowledgebase/133/OpenVPN-configuration-for-Raspberry-PI.html
now im using this repos
deb http://ftp.hk.debian.org/debian/ wheezy main
deb-src http://ftp.hk.debian.org/debian/ wheezy main
#deb http://security.debian.org/ wheezy/updates main
#deb-src http://security.debian.org/ wheezy/updates main
# wheezy-updates, previously known as ‘volatile’
deb http://ftp.hk.debian.org/debian/ wheezy-updates main
deb-src http://ftp.hk.debian.org/debian/ wheezy-updates main
# Proposed updates
deb http://ftp.es.debian.org/debian/ wheezy-proposed-updates main contrib non-free
# Oficiales
deb http://ftp.es.debian.org/debian/ wheezy main contrib non-free
deb-src http://ftp.es.debian.org/debian/ wheezy main contrib non-free
# Seguridad
deb http://security.debian.org/ wheezy/updates main contrib non-free
deb-src http://security.debian.org/ wheezy/updates main contrib non-free
# Multimedia
deb http://deb-multimedia.org/ wheezy main non-free
deb-src http://deb-multimedia.org/ wheezy main non-free
# Backports
deb http://ftp.debian.org/debian/ wheezy-backports main contrib non-free
deb-src http://ftp.debian.org/debian/ wheezy-backports main contrib non-free
# Mozilla
deb http://mozilla.debian.net/ wheezy-backports iceweasel-release
deb-src http://mozilla.debian.net/ wheezy-backports iceweasel-release
# VirtualBox
deb http://download.virtualbox.org/virtualbox/debian wheezy contrib
deb http://download.webmin.com/download/repository sarge contrib
deb http://webmin.mirror.somersettechsolutions.co.uk/repository sarge contrib
dont forget to add the signature
wget -q http://download.virtualbox.org/virtualbox/debian/oracle_vbox.asc -O- | sudo apt-key add –
wget -q http://mozilla.debian.net/archive.asc -O- | apt-key add –
I have trouble with my debian instalation after removing xfce and migrating to gnome. the terminal appeard like this :
dpkg: warning: files list file for package ‘libc6:i386’ missing; assuming package has no files currently installed
dpkg: warning: files list file for package ‘libslang2:i386’ missing; assuming package has no files currently installed
so i found tutorial in here:
http://serverfault.com/questions/430682/dpkg-warning-files-list-file-for-package-x-missing
and here
https://blog.srvbox.com/aptitude-dist-upgrade-or-howto-resolve-dpkg-warning-files-list-file-for-package/
Ill try the solution with this script :
for package in $(apt-get upgrade 2>&1 | grep “warning: files list file” | sed “s/.*’//; s/://”); do apt-get install –reinstall “$package”; done
and then this script :
for pp in `awk ‘/files list file for package/ {p=$8; if ($8 !~ /47/) p=$11; gsub(/47|:.*/,””,p); if (!packages[p]) packages[p]=p;} END {for (i in packages) print i; }’ /var/log/apt/term.log`; do
aptitude reinstall “$pp”;
done
and maybe this last try to update per package by command :
dpkg-deb -c /var/cache/apt/archives/libc6_2.13-38_i386.deb | awk {‘sub(/^\./,””,$6);sub(/^\/$/,”/.”,$6); sub(/\/$/,””,$6); print $6’} > /var/lib/dpkg/info/libc6:i386.list

Here some command to get load balancing server as a router two, by joining two interface with internet connection based on this article.
ip link set lo up
ip link set eth0 up
ip link set eth0:0 up
#ip link set usb0 up
ip route flush table rt_dev1
ip route flush table rt_dev2
ip route flush table internetip addr add 127.0.0.1/8 brd 127.0.0.255 dev lo
ip addr add 192.168.42.83/24 brd 192.168.42.255 dev usb0
ip addr add 192.168.1.1/24 brd 192.168.1.255 dev eth0
ip addr add 192.168.1.2/24 brd 192.168.1.255 dev eth0:0ip rule add prio 10 table main
ip rule add prio 20 table rt_dev1
ip rule add prio 30 table rt_dev2
ip rule add prio 40 table internetip route del default table main
ip route del default table rt_dev1
ip route del default table rt_dev2
ip route del default table internetip rule add prio 20 from 192.168.42.0/24 table rt_dev1
ip route add default via 192.168.42.129 dev usb0 src 192.168.42.83 proto static table rt_dev1
ip route append prohibit default table rt_dev1 metric 1 proto staticip rule add prio 30 from 192.168.1.0/24 table rt_dev2
ip route add default via 192.168.1.3 dev eth0:0 src 192.168.1.2 proto static table rt_dev2
ip route append prohibit default table rt_dev2 metric 5 proto staticip rule add prio 40 table internet
ip route add default proto static table internet nexthop via 192.168.42.129 dev usb0 weight 1 nexthop via 192.168.1.3 dev eth0:0 weight 1iptables -F
iptables -P INPUT DROP
iptables -A INPUT -i eth0 -j ACCEPT
iptables -A INPUT -i usb0 -p tcp -s 0/0 –dport 25 -j ACCEPT
iptables -A INPUT -i eth0:0 -p tcp -s 0/0 –dport 25 -j ACCEPT
iptables -A INPUT -m state –state ESTABLISHED,RELATED -j ACCEPT
iptables -A INPUT -p tcp -i usb0 -j REJECT –reject-with tcp-reset
iptables -A INPUT -p tcp -i eth0:0 -j REJECT –reject-with tcp-reset
iptables -A INPUT -p udp -i usb0 -j REJECT –reject-with icmp-port-unreachable
iptables -A INPUT -p udp -i eth0:0 -j REJECT –reject-with icmp-port-unreachable
iptables -t nat -A POSTROUTING -o eth0:0 -j SNAT –to-source 192.168.1.2
iptables -t nat -A POSTROUTING -o usb0 -j SNAT –to-source 192.168.42.83
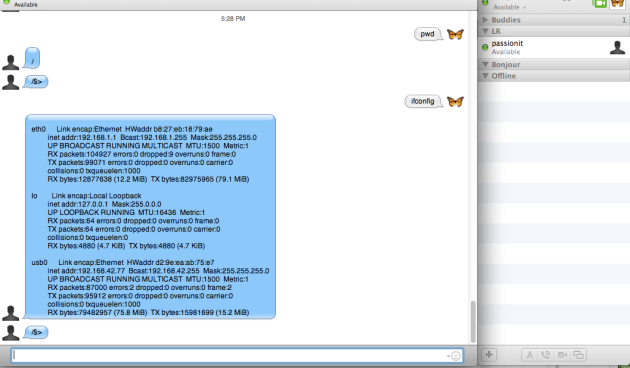
Now u can remotely access SSH shell from your computer or mobile phone (or you can call it Smartphone) by installing robotito in your Raspberry Pi or your Debian Box you can access SSH just from Google Talk anywhere anyfrom.
I made a script (tested on my raspian OS in Raspberry Pi) so u can easyly install robotito. this is the steps
1. Open Shell Command or u can call it Terminal, go to your home folder, Download installer script by command :
wget https://opengateway.googlecode.com/files/robotito
it will save to you home folder ~ (e.g /home/pi)
2. after that running the script by entering command :
sudo ./robotito
3. and then you can edit file credentials.rb in config folder if robotito using your gtalk account and save it by pressing ctrl+x and y . Default is using nano editor.
4. running the robotito in robotito folder by command
./jabbershd start
5. done you can use now from any google talk client, dont forget to add robotito gtalk account to your google talk account and test it with chatting each other before using the account.
